Showing posts with label Comfort Food. Show all posts

Monday, February 8, 2010

Bakerella's Peach Crunch Cake


I love peaches. In fact I am a peach snob. I won't buy them in the grocery store. They must come from a peach shed. (It's a Southern thing, I'll tell you about it in a new series called Southern Charm sometime soon.) Once a year, in late July, there is a variety of peach available in South Carolina called the Freestone. It is called this because you can cut the peach in half and pop the stone out with your fingers. This was the variety of peach in Eden, I am sure of it. The smell alone makes my mouth water.

Alas, it is not late July, and this is not South Carolina. It is early February and there is an ungodly amount of snow on the ground outside.

A few weeks ago, I noticed a recipe on Bakerella's blog for a peach crunch cake. (If you don't know her, get to know her...she is fabulous!) This recipe is different from any I've seen. It calls for canned peaches, which I can deal with for baking. It looked so amazing that I just had to try it. I cannot wait to see how it turns out with a few of my beloved Freestones this summer!

Give it a try, you will not be disappointed!

Bakerella's Peach Crunch Cake

24.5 oz peaches in light syrup (she used jarred, I used 2 cans)
1 yellow cake mix
1 stick butter, cut into 16 even slices
1 c. brown sugar
1/2 c finely chopped nuts

Dump the peaches into a 9X13 dish (including syrup). Cut the peaches in half and distribute them evenly. Dump the cake mix on top and spread it evenly. Place the butter pats, spaced evenly, on top. Sprinkle on the brown sugar. Sprinkle on the chopped nuts. Bake at 350* for 40 minutes.

I wish I had a Smell-O-Blog so that you could get a whiff of what is coming from my oven right now...MMMmmmm.

If you want to see Bakerella's full tutorial for this recipe, you can check it out HERE.

*This post is linked to the Ultimate Recipe Swap at Life as Mom...check it out!

Wednesday, February 3, 2010

Buttermilk Biscuits ~ Southern Style


I have not been able to conjur up a good batch of biscuits since I moved North, until recently. Well, let me tell you,

All I ever needed to know about life biscuits, I learned from my momma and Alton Brown!

Did you know that there is Yankee flour and Southern flour? I didn't! Southern flour is better suited for biscuits, because biscuits are a Southern food...imagine that! Mr. Brown explains the scientific reason behind this in his Good Eats episode, The Dough Also Rises. So, before telling you how to make fab biscuits, let me stress the importance of looking at the flour sack to see where it was produced. Find something from Tennessee, North Carolina...you get the picture.

Also, please use real buttermilk. Turning regular milk with vinegar just doesn't work as well. And, for heaven's sake, don't use regular milk straight up! Buttermilk lasts FOREVER in the fridge, and is good for so many things...cornbread...cakes....

I have adapted many of Mr. Brown's tips into my biscuit making. Here are the results....YUM!

Ingredients:
2 cups SOUTHERN self-rising flour
2 T butter
2 T shortening
1 cup buttermilk

(Mr. Brown contends that it is better to use all-purpose flour along with 4 tsp. baking powder, 1/4 tsp. baking soda, and 3/4 tsp. salt. Unfortunately, I have not been able to find Southern all-purpose flour here. So, I'm making-do with self-rising.)


Preheat oven to 450*.


Lightly grease a shiny metal pan with shortening.


Add flour to a bowl (along with baking powder, baking soda and salt if you're using all-purpose flour).


Add butter and shortening.


Using a pastry blender, 2 forks, or your fingers cut the butter and shortening into the dry ingredients until the mixture resembles fine crumbs.


Make a well in the center and pour in your real, bonafide buttermilk.


Stir it all up until it holds together, but not a second more. The more you work the dough, the tougher your bisciuts will be.
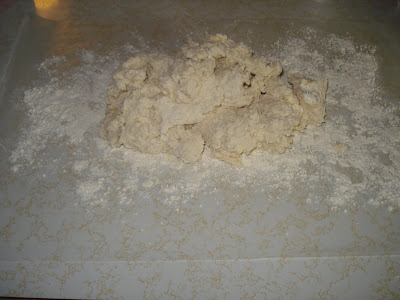


Flour some wax paper and turn the dough out on to it. Notice the extra flour on the sides, there. Well, you're gonna use that. Pick up the edges of the wax paper and bring them together, causing that flour to cover the top of your dough. Use the wax paper to pull the dough together. Release the wax paper and fold the dough onto itself several times.


Do this as little as possible, but until it is relatively smooth.


Now it is time to pat it out. Use a rolling pin if you must, but in my opinion it is just a waste of time and gives you something else to wash. (Save the rolling pin for pie crusts.) Besides, if your biscuits are too perfect someone is liable to accuse you of getting them from a tube! Pat the dough out evenly with your hands until it is about an inch thick.


Now it is time to cut. I do not like my cutter, I want one that is open in back. I feel like this one is pressing down on the top of the biscuit. But, for now it is what I have. Push straight down, do not twist as you cut. I sometimes find it easier to peel away the scrap before lifting the cutter, as you see here, in order to pick up the cut biscuit.


Place gently on pan, lightly touching on the sides. Mr. Brown says it is important to gently mash your thumb into the center so that they will rise flat, instead of domed. Whatever... I just think it is fun to mark them. If they all have my thumbprint in them, then they are all mine to eat...right?

Baking times vary based on your oven. Mine is perfect at 18 minutes. Start watching them at 15. They should be golden on top. ( I let these go just a minute or two too long...they're still yummy, though!)

Now, while they're still hot, cut one open and put a pat of butter and a spoonful of brown sugar inside...then close it up and give it a few seconds to melt together. Make sure your momma is nowhere close, because it's gonna make you want to smack her!

Thursday, November 19, 2009

"Good For You" Southern Style Green Beans


A few months ago we had some friends over for dinner. While going back for seconds "Tom" said, "These green beans are fantastic, I cannot stand the ones that come out of a can." I laughed and confessed that those green beans had indeed come out of a can.

This recipe is a result of my efforts over the years to make Southern-style food that doesn't clog your arteries. I promise, you'll love them! I am pretty faithful to Hanover's Blue Lake Green Beans. Allen Green Beans are good as well. But, use whatever is in your stockpile.

Canned green beans (amount appropriate for you)
Olive Oil
Cavendar's Greek Seasoning

Empty beans, liquid and all, into appropriately sized pot on medium heat. Add olive oil, I never measure but I would say 1 Tablespoon for every pound of beans. Then add Cavendar's. Again, I don't measure, but start with 1/2 teaspoon per pound and add more if you like later in cooking. I'm sure I use more than that. Now, stir well and let them simmer for a couple of hours on the stove, but make sure to not let them cook dry. I stir often. This disturbs some folks because the beans start to cook down and fall apart instead of keeping their "cut bean shape"...but that's the way we Southerners like them!

Life As Mom is having a Thanksgiving recipe swap today...go over and check it out!

Wednesday, November 18, 2009

A Few of My Favorite Things-Cavendar's Greek Seasoning


Have you ever had a recipe that needed "something" but you couldn't figure out what? Chances are, this would have been just the thing. I use Cavendar's Greek Seasoning in just about everything.

A few years ago I took green beans to a potluck. One lady tasted them and said. "With the way these taste, and knowing where you are from, they have to be made with fatback." I told her that I do not cook with fatback, and she didn't believe me. One secret to those yummy, canned (yes, canned) green beans is Cavendar's. On another day I will share that recipe (so super-easy).

Cavendar's is a spice blend containing pepper, sugar, onion powder, parsley and "other spices". Besides green beans, I use it in pinto beans, on poultry (even my Thanksgiving Turkey), on just about any vegetable, on baked fish, and in homemade soup. It is flavor, not heat and goes so well with a multitude of foods without making them taste all the same.

At this point, the only place that I can find Cavendar's locally is Super Wal-mart. In the past, Food Lion has carried it as well. I did find it several places online. The best deal I have come across is at AmericanSpice.com. There you can purchase three containers for about $5 each with shipping. I have not used their site before, but they are Better Business Bureau approved. You can also purchase it in bulk from Amazon. As you travel South, it becomes more readily available.

Cavendar's is a staple in my house. I would rather run out of salt and pepper than this wonderful seasoning, which definitely makes it on of my favorite things!

Friday, November 13, 2009

Apple Syrup and Cinnamon-Pecan Pancake Mix

One of my favorite things about Fall is the wonderful local apples that are available here in Maryland. My new favorite is the Cortland. It is tart, crisp and wonderful for cooking. I spent several days recently cooking up batches to put in the freezer. I don't make applesauce, but keep the chunks intact for a wonderful winter side-dish.

It was really bothering me to throw away all of those peelings. So I did a little research and discovered that you can cook them down to make syrup. I experimented until I got the recipe just right.

Apple Peel Syrup

6 Cups Water
6 1/2 Cups Sugar
Peelings from @ 18 apples
Cinnamon to taste

Bring all four ingredients to a boil in a large stockpot. Stir until sugar dissolves. Reduce heat to medium and simmer until peels lose their bright color. (Approximately 10 minutes.) Remove apple peels with tongs or a slotted spoon. Continue simmering until mixture has reduced by half. Test consistency by dipping a spoon into the mixture and then rubbing your finger across it. You will be able to tell when it has thickened. Cooking time will vary. You may can this in sterile jars or let it cool and keep in the refrigerator. Yeild 5-6 half-pints.

Please note that I am by no means an expert canner. For directions on canning please do your research. I reccommend the Ball Blue Book of Canning and Preserving.

This syrup is especially tasty when paired with Cinnamon-Pecan Pancake Mix.

Cinnamon-Pecan Pancake Mix

3 Cups of your favorite pancake mix
2 1/4 Cups Water
2 T Cinnamon
1/2 Cup finely chopped Pecans

This makes 18-22 pancakes. If you want to package the mix for a gift, combine the dry ingredients and add to a Quart jar (fits nicely). Make sure to add a tag that explains the number of servings and how much water to add.

Monday, November 9, 2009

Super Fast Ham Steak With Apples

My family gets excited when they smell this cooking. The aroma is fantastic. It is one of the quickest meals in my repertoire, from gathering ingredients to table in about 20 minutes. I found this one on my favorite recipe site, Recipezaar. I like to add a green vegetable, and occasionally a starch to round out the meal.


Brown Sugar Ham Steak with Apples
Serves 4

2 T. Butter
1/4 C. Brown Sugar, packed
2 T. Grainy Mustard
3 Tart Apples, peeled, cored and coarsely chopped (I've used Cortland and Winesap)
1 lb. (or larger) Ham Steak

Melt butter on medium heat in large skillet. Add brown sugar and mustard, whisk to blend. Add apples and toss. Simmer for 5 minutes. Transfer apples to a bowl. Place ham steak in skillet and top with apples. Cook, covered, over medium heat for 10 minutes.

There are seldom any leftovers!

Thursday, November 5, 2009

Black Bean Chicken Chili

One of the blogs that I follow on a daily basis is Life As Mom. This week she has been focusing on food that can been made ahead of time and stored in the freezer. This inspired me to share one of my favorite cold-weather meals. I use the crock pot for this recipe but it can be thrown together quickly on the stove too. It also freezes perfectly. I usually make this the day after I have roasted a whole chicken. The seasoning in the leftover meat really adds to the flavor, and I prefer shredded chicken to cubed. It's just a texture thing. This is very hearty and stew-like. I usually add a salad and some bread for a wonderful meal.

Black Bean Chicken Chili

1 T. oil
1/2 sweet onion, diced
1 bell pepper, diced
2 cloves garlic, minced
1 can chicken broth
2 15 oz cans black beans (rinsed)
2 14 oz cans diced tomatoes (I like chili-style)
1 lb shredded chicken
2 tsp. cumin
1/8 tsp. red pepper (or more to taste)
Chili powder (I never measure this, but I use a lot. Adjust to your taste.)
1/4 c. fresh cilantro

Saute onion, garlic and bell pepper in oil until onion is translucent. Place in crock pot. Add tomatoes, beans, chicken, broth and seasonings. Cook on low for 3-4 hours. Add fresh cilantro just before serving. Shredded cheese may be added when serving as well.

All this really needs is to get hot, thus the crock pot is not necessary. I love the way the flavors meld after cooking slowly through the day. The meat just gets more tender this way. If you like your chili, soups and stews thicker, just take the lid off of the crock for the last hour or two. It will thicken nicely.

Monday, November 2, 2009

Crock-Pot Chicken & Dressing

I just have to share one of my new favorite recipes. It fits this time of year so well. And, I am happy to report that the entire family really likes it. I found it on cooks.com, which is not my normal recipe site, but a google search brought it up. Boy, am I glad it did! If you keep chicken broth and cream of chicken soup on hand, it can be made up with leftovers. I keep a gallon ziplock in the freezer for leftover cornbread and biscuits, then thaw and crumble as needed. I like to round out the menu with sweet potatoes, baked or mashed, and green beans. This is comfort food at it's best!

Crock-Pot Chicken and Dressing

1 1/2 lb boneless, skinless chicken (cooked and pulled apart)
2 cans cream of chicken soup
1 c. chicken broth
1 stick butter, melted
1 T. sage
2 eggs, boiled & chopped (I break them into a pyrex bowl, cover and microwave)
2 1/2 c. corn bread, crumbled
1 c. white bread or biscuits, crumbled
1 onion, chopped (I use dehydrated)

Spread 1/2 can of chicken soup in bottom of crock pot. Reserve remaining 1/2 can for topping. Combine all other ingredients except chicken. Alternate layers of the dressing mixture with chicken, ending with chicken. Spread reserved chicken soup on top. Cook on low for 3-4 hours. Enjoy!

*This recipe is linked to the Ultimate Recipe Swap at Life As Mom.
Related Posts with Thumbnails